Many of us have the idea of transferring files between Laptop and Mobile phone using wifi connection, but it is not possible to do that directly. So we are going to do some tricks and gonna make it happen.
I am going to describe the steps using my mobile phone Nokia E63 and Laptop running Windows 7 Operating system. However other wifi enabled mobile phones and iPods will also be working.
Initially, we need the following:
1.Obviously, a wifi enabled mobile phone (say Nokia E63)
2. Laptop (In this post I’m using Windows 7 Home Premium operating system)
3. Web Server software. (IIS or Apache. In this post I’m using IIS 7.0 Web Server)
Setting up the IIS Web Server:
To setup the IIS Web Server you need either Windows XP Professional edition or Windows 7(any version except ‘Home Basic’). Here I’m going to show you how to install IIS Web Server in Windows 7 Home Premium.
Open
Control Panel—> Programs And Features –> Turn Windows Feature on or off
 .
.
A new dialog box will be opened. In that select Internet Information Services and click ok and wait while Windows installs IIS Server in your machine.
Now IIS is installed successfully.
Setting up the Ad Hoc network:
Now we have to setup the Ad Hoc network on our laptop.
Open
Control panel—> Network and Sharing Centre  --> Setup new connection or network
 .
.In the new dialog window select setup a new network it will take some time to show the details. Then select the appropriate option to setup a ad hoc network with default values.
Configuring the website:
To configure the website we need to do little work here. Open Control Panel—> Administrative Tools—> Internet Information Services (IIS) Manager.
In the new windows that appears select the website under connections pane—> sites under that select your web site by double clicking it.
On the right pane select Bindings and click Add. Now select http as type and in the IP Address field put some ip address like 192.168.1.15 and leave the Port as 80. Leave the Host Name field empty and click Ok and click Close to return back to main window.
In the right pane under
Manage Website select
Restart. Now you will see something like this

. Now click on
Browse 192.168.1.15:80 (http) to check the whether the website is working correctly. It will open your web browser and show the
Welcome Page or IIS 7 Page.Configuring the firewall in Laptop:
Open Control Panel—> Windows Firewall.
In the new window select Allow a program or feature through Windows Firewall option.
It will open a new dialog window select World Wide Web Services (HTTP) select Change Settings and select the Home/Work(private) and Public Check box and click Ok.
Configuring the connection for mobile phone:
Now click on the
Wireless Networks icon in the
System Tray 
and select the Ad hoc network you have created. In this example the Ad hoc network name is
Dell Raja. Now click connect.

Now scan for wireless access point in mobile and select
Start Browsing. In the web browser type in the
IP Address you have given for the website, in our example
192.168.1.15. After getting connected to the Ad hoc network right click and select the
status in the new dialog window select
Properties in the
Internet Protocol Version 4(TCP/IP4) and select
Properties select
Use the following IP address radio button and enter the ip address of the website we have previously configured, in our example
192.168.1.15 in the
IP address field. Then enter the
Default Gateway as
255.255.255.0. Click Ok if any pop up windows appears then click Ok.
Tip:
If you connect your laptop to some other network then you may need to change the above settings to Obtain IP address automatically otherwise the connection may not work properly.
Now disconnect your mobile phone from the laptop and connect it once again using the previous procedure.
Tip:
Save a bookmark with the IP address and Connection name in the mobile for easy and quick access. See an example screen shot below.
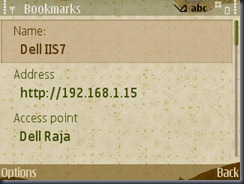
After entering the IP address correctly you will see the IIS 7 Welcome page as you have seen before in the local (laptop’s) web browser.
 Transferring files:
Now open the default folder for our website and paste the file you want to transfer. For our convenience we rename the file like “
Sample.zip”. Now type in the address something like
http://192.168.1.15/Sample.zip.

It will start to download the file with almost
550 kbps at an average
.
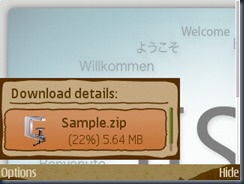
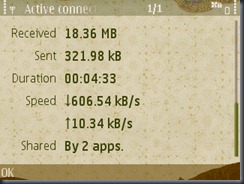
The above screen shot shows the file is being downloaded at
606.54 KBps, quiet fast isn’t it
.
Important Note:
This trick will work for almost any mobile phone, PDA, IPod enhanced with Wifi.
You can use also use Apache Web Server, which is an open source software but you have to follow its own installation and configuration procedure. To know how to setup Apache Web Server Click Here.
Enjoy faster file transfer.


